How to Trace a Picture onto Paper (Even from Your Phone)
Tracing is the quickest way to get the outline of a picture onto paper with the right proportions. Once the outline is down, you can shade it, color it, ink it or paint over it, and the finished piece still looks like the photo you started from.
There is no single correct way to do it. Which method works best depends on what you have at hand: a sunny window, a lightbox, a printer, or just your phone. This guide walks through four methods step by step, says honestly where each one falls short, and finishes with tips that make any traced outline cleaner.
What you need
Whatever method you choose, the basic kit is the same and cheap:
- The picture you want to trace, either printed or on your phone or tablet.
- Paper. Thin printer paper is easiest to see through; thick drawing or watercolor paper needs one of the methods that does not rely on light shining through.
- A pencil. A harder lead such as HB or 2H leaves light lines that are easy to erase or cover later.
- A soft eraser and some low-tack tape (masking or painter's tape) to stop the paper from sliding.
Pick a picture with a clear subject and good contrast. A dog against a plain wall is far easier to trace than a crowded street. Use your own photos or images you have permission to use, especially if you plan to share or sell the drawing.
Method 1: The window method
This is the oldest trick and costs nothing. Daylight coming through a window works like a giant lightbox.
- Print the picture at the size you want the drawing to be.
- Tape the printout to a window that has bright daylight behind it.
- Tape your paper over the printout. The outlines should show through.
- Trace the main shapes lightly with a pencil, then take both sheets down and finish the drawing at a table.
Limitations: it only works in daytime, drawing on a vertical surface tires your arm quickly, and thick paper blocks too much light. You also need a printer, and the drawing can only be as big as your printout.
Method 2: A lightbox or a tablet screen
A lightbox is a thin, evenly lit panel made for exactly this job. It does the same thing as a window, but flat on your desk and at any time of day.
- Put the printout on the lightbox and the paper on top, and tape both down.
- Turn the light up until the lines show through clearly.
- Trace with light pencil pressure.
If you do not own a lightbox, a tablet can stand in for one. Open the picture, turn the screen brightness to maximum, set the screen to stay on, and lay thin paper directly over the glass. Press gently, and consider a clear plastic sheet between the paper and the screen to keep graphite off the glass. Turn off touch input if your device allows it, or the picture may zoom and scroll under your hand.
Limitations: the drawing can be no larger than the panel or screen, and thick papers still block most of the light. On a phone the screen is usually too small to be practical.
Method 3: Graphite transfer (works on thick paper)
When you need to transfer onto heavy paper, card, wood or canvas that light cannot pass through, use the graphite transfer method.
- Print the picture at the final size.
- Turn the printout over and cover the back of the areas you want to transfer with soft pencil, such as 4B or 6B. Ready-made graphite transfer paper does the same job.
- Place the printout face up on your paper and tape it down.
- Go over the outlines with a ballpoint pen or a hard pencil. The pressure pushes graphite from the back onto your paper.
- Lift one corner now and then to check that the lines are coming through.
Limitations: it needs a printer, it is messier than the other methods, and it is easy to press too hard and leave grooves in the paper.
Method 4: Trace a picture from your phone
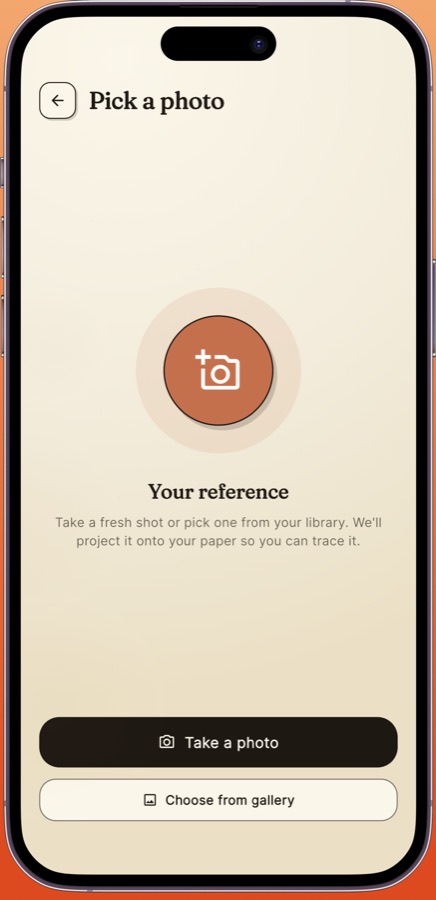
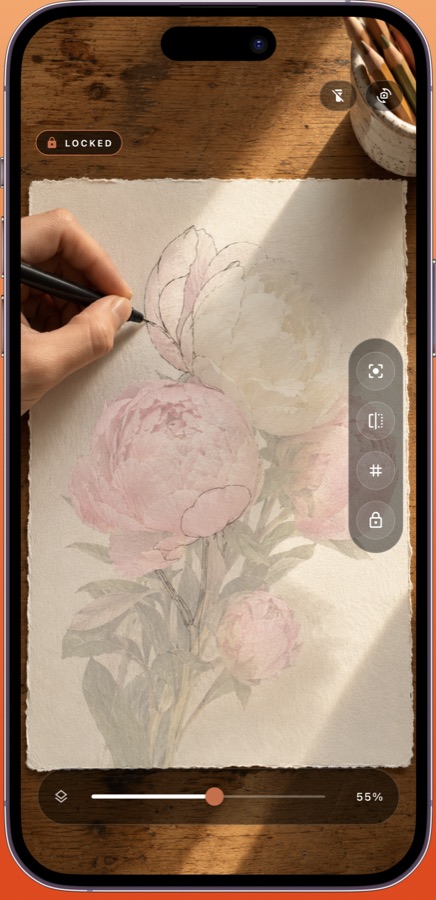
A camera tracing app turns this around. Instead of shining light through the paper, the phone sits above the paper and shows its live camera view. The app lays your chosen picture over that view, semi-transparent, so on the screen you see the picture, the paper and your pencil tip together. You follow the lines of the picture while watching the screen, and they appear on the real paper.
Because nothing has to shine through the paper, this works on thick paper, card and canvas, at sizes larger than your phone, and without a printer. Here is how to do it with Tracely:
- Open Tracely, tap Trace from Photo, and take a new photo or choose one from your gallery.
- Tape your paper to the table.
- Hold the phone, or better, prop it on something stable such as a stack of books or a clear glass, 20 to 40 cm above the paper with the camera pointing straight down.
- Drag the opacity slider until you can see both the picture and the paper clearly.
- Pinch with two fingers to resize the picture, and twist to rotate it, until it sits where you want it on the sheet.
- Turn on the 3x3 grid if you want help keeping proportions and re-aligning after a bump.
- Tap Lock so your hand cannot move the picture by accident, then trace while you watch the screen. Hold two fingers on the screen to unlock.
Limitations: the phone has to stay still, so a simple stand matters more than anything else. Your eyes are on the screen rather than the paper, which takes a few minutes to get used to. Tracely shows the photo itself rather than converting it into line art, so photos with clear edges and good contrast are easiest to follow.
Which method should you use?
- Thin paper, daylight, and a printer: the window method is free and accurate.
- Frequent tracing on thin paper: a lightbox is the most comfortable.
- Thick paper, card or canvas, with a printer: graphite transfer.
- No printer, any paper, or larger than letter or A4 size: trace from your phone with a camera app.
- Thin paper and a tablet, no printer: use the tablet as a small lightbox.
Tips for a cleaner traced outline
- Press lightly. Traced lines are a guide, not the final drawing, and light lines are easy to fix.
- Trace outlines and the edges of big shadow shapes. Skip fine texture such as fur, grass or hair strands, and add it later by looking at the photo.
- Mark key points first, like the corners of the eyes, the tip of the nose and the corners of the mouth, then join them. Small dots are often more accurate than long strokes.
- Check your progress by lifting the top sheet, or by moving the phone away, before you have traced everything.
- When the outline is done, put the reference aside for a moment and look at the drawing itself. Fix anything that looks stiff before shading.
Frequently asked questions
Is tracing cheating?
No. Artists have used grids, the camera obscura, projectors and lightboxes to transfer images for centuries. Tracing handles proportions; the shading, line quality and color are still your work.
Can I trace a picture from my phone without an app?
For small pictures, yes: turn the brightness up and lay thin paper over the screen, as described in Method 2. For larger drawings, thick paper, or a more comfortable position, a camera tracing app that keeps the phone above the paper works better.
Does Tracely turn my photo into a line drawing?
No. It shows the photo itself over the camera view, and you control how see-through it is. Choose a sharp, high-contrast photo, or raise the contrast in your phone's photo editor first.
Do I need an account to use Tracely?
No. The web version runs in your phone or tablet browser, and Tracely is also available for iPhone and iPad and Android. The web version keeps your photos in your own browser; nothing is uploaded.