Best Way to Trace for Beginners: Tools and Tracing Apps
If you have always wanted to draw but get stuck on the very first lines, tracing is a sensible place to start. The hardest thing for a beginner is proportion: eyes too far apart, a head too large for the body, a building that leans. Tracing takes that problem away so you can practice everything else, and you finish with a drawing you are happy to keep.
This guide compares the main ways to trace, explains what actually matters in a tracing app for drawing, walks you through a first session, and covers the problems almost every beginner runs into.
Why tracing is a good way to start
Artists have long used aids to transfer images, from grids and the camera obscura to projectors and lightboxes. Tracing is not a way around learning to draw; it splits the job into parts.
When the outline is traced, you can concentrate on line weight, shading, texture and color. Tracing the same kind of subject a few times also teaches you its shapes. After tracing a few cat faces you notice where the eyes sit and how wide the ears really are, and that carries over when you draw freehand.
Choosing a tracing method
There are three common ways to trace. Each is genuinely good in some situations:
- A window or a lightbox: tape a printout behind thin paper and let light shine through. Accurate and relaxing, but only for thin paper and only as big as the printout or the panel.
- Graphite transfer: shade the back of a printout and draw over the front to press the lines onto thick paper. Good for card and canvas, but needs a printer and gets messy.
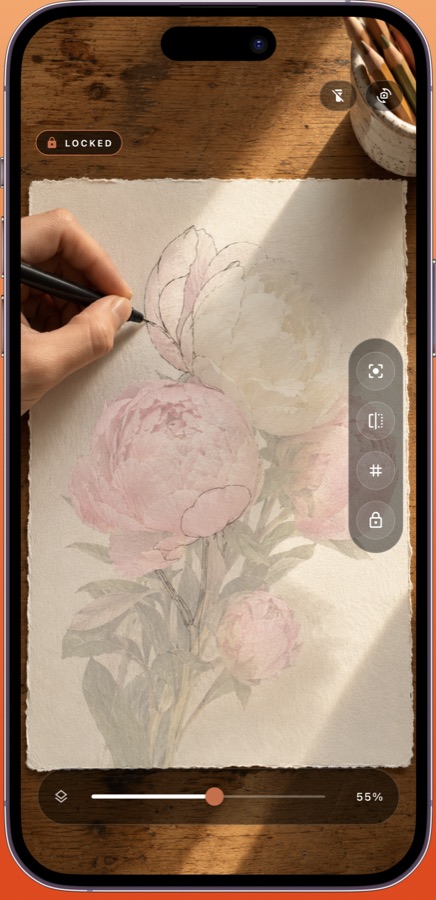
- A camera tracing app: your phone sits above the paper and shows your photo over the live camera view. No printer, any paper thickness, and sizes larger than the phone. The trade-offs are that the phone has to stay still and you watch a screen while you draw.
For a complete beginner with no printer or lightbox, a camera tracing app is usually the fastest way to start. If you already own a lightbox, use it; it is very comfortable. Our guide on how to trace a picture onto paper covers each method in more detail.
What to look for in a tracing app for drawing
Apps that help you trace work in two different ways. Some let you trace on the screen with a finger or stylus, producing a digital drawing. Others, sometimes called AR drawing or camera tracing apps, help you draw on real paper. If your goal is a pencil drawing you can hold, you want the second kind. When comparing them, these are the features that make a practical difference:
- Your own photos. Tracing your own pet, family or garden is what most people actually want to do.
- An opacity control, so you can balance how much of the photo and how much of the paper you see.
- Pinch to resize and twist to rotate, so the picture fits the paper instead of the other way round.
- A lock. Once your hand is near the screen, accidental touches will move the picture. A lock prevents that.
- A grid overlay, which helps with proportions and with lining things up again if the phone moves.
- A layout that suits your drawing hand. If you are left-handed, controls on the right side are constantly in the way.
- Tablet support. A tablet in landscape gives a bigger, steadier view of a larger sheet.
It is also worth knowing what an app does to your photo. Some convert it into line art automatically. Tracely does not; it shows the photo itself, semi-transparent, and you decide which lines to follow. That keeps you in control, but it means a sharp, high-contrast photo will be easier to trace than a dark or blurry one.
Your first tracing session, step by step
This walk-through uses Tracely, which is available as a free web version and as an app for iPhone and iPad and Android. The same ideas apply to other camera tracing apps.
- Choose a simple first subject: a single flower, a mug, or a pet photographed against a plain background. Avoid busy scenes for now.
- Set up in good, even light, and tape a sheet of paper to the table so it cannot slide.
- Build a steady stand. A stack of books on each side with the phone bridging them, or a clear drinking glass under the phone, works fine. The camera should look straight down at the paper from about 20 to 40 cm.
- In Tracely, tap Trace from Photo and choose your picture.
- Lower the opacity until you can clearly see your paper and pencil through the photo.
- Pinch and twist to size and position the photo on the paper. Leave a margin around the edges.
- Switch on the 3x3 grid. Lightly mark a few grid corners on the paper; they make re-aligning easy if anything moves.
- Tap Lock. If you are left-handed, choose the left-handed layout in Settings first so the controls are out of your way.
- Trace only the main outlines and the edges of big shadows, with light pressure. This usually takes ten to twenty minutes for a simple subject.
- Unlock by holding two fingers on the screen, move the phone away and finish the drawing by looking at the photo: add shading, texture and details by eye.
Common beginner problems and how to fix them
The picture drifts away from my lines
Something moved. Tape the paper down, use a firmer stand, and lock the picture. If it still shifts, unlock, line the grid up with the corners you marked, and lock again.
The drawing looks stretched or skewed
The camera is probably tilted. When the phone is not parallel to the paper, the far side of the image is drawn smaller than the near side. Level the phone so it looks straight down, and check the grid squares look square on the paper.
I can't see my pencil lines
Lower the photo's opacity, add more light to the room, and use a pencil dark enough to show on camera. A softer lead such as 2B is easier to see than a very hard one.
My hand covers what I'm tracing
Work from the side of the paper away from your drawing hand, and turn the paper (and the picture) if needed. Left-handed users should switch the layout so the controls sit on the other side.
My lines look shaky
This is normal at first. Draw with your whole arm rather than just your fingers, make several short light strokes instead of one long one, and go over the best line afterwards.
From tracing to drawing on your own
Tracing works best as a stage rather than a destination. A simple way to build skill is to trace less each time:
- First drawings: trace the outline and all the main shadow shapes.
- Next: trace only the outline, and place the shadows by eye.
- Then: trace only a few key points, such as eyes, nose and the edges of the head, and draw the rest freehand.
- Finally: use only the grid as a guide, and draw everything by observation.
Pet portraits are a popular next step because the subject is personal and the shapes are forgiving. See our guide on how to draw your pet from a photo.
Frequently asked questions
What paper should a beginner use?
Ordinary printer paper is fine for practice. For a drawing you want to keep, a smooth drawing paper or sketchbook works well. With a camera tracing app, paper thickness does not matter.
Do I need a stand for camera tracing?
You do not need to buy one. Books, boxes or a clear glass work. What matters is that the phone does not move and the camera looks straight down.
Can kids use a tracing app?
Yes, tracing is a popular activity with children. An adult can help set up the stand and choose a simple, high-contrast photo.